5 Hardware Options for Canvas Prints with CanvasChamp

Do you find yourself having discovered a beautiful collection of canvas art, yet your walls are still blank? From search quests, for the best artworks, you may have gone from antique store to online shops to get your personalised creations, but now the time has come for you to decide how to display them. But stuck at how to determine where to place the prints?
Just decide on placement, and we will help you hang them on the wall. So keep the sizes of your personalised canvas prints in mind and read on through the article.
Find the Right Ways To Hang A Canvas
Generally, these days, canvas prints come along with hardware finish attached to them if ordered from online stores. But if you want to save on the extra charge of getting a ready-to-mount canvas wall art then these are some of the options for you:
1. Nails

You have to choose nails according to the size of the canvas. For small and medium canvases, nails work the best. Canvas sizes from 8x8-inch to 16x16-inch do a better job hanging to the walls with nails. Steel or brass nails are an excellent choice as they can go quickly through the wall without damaging the wall. You will need at least one to two nails for your canvas depending on its size.
Step 1: Measure the wall and place your mark for the canvas with a pencil.
Step 2: Then hammer the nail into the marks
Step 3: Don't wholly hit the nail in the wall, leave at least half an inch out to hang the canvas on the nail.
Step 4: Mount your canvas on the nails.
2. Sawtooth Hanger

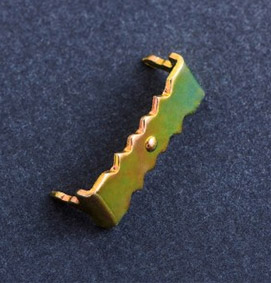
Sawtooth hangers come in various sizes, so make sure you pick one that is right for your canvas size. They are very popular with custom canvas prints and work fantastic with small to medium sizes of canvas. Sawtooth hangers are always fixed in the middle of the canvas. To set a sawtooth hanger, you will need a few screws and a nail for it.
Step 1: Hit the nail into the hanger hook at a slight angle. The nail fixed at an angle will add strength to the hanging and assure the wall takes most of the weight of the canvas.
Step 2: Measure the back frame of the canvas to mark its central point.
Step 3: Place the sawtooth in the central part of the canvas.
Step 4: Use two screws to fix the sawtooth in the centre.
Step 5: Screw in real tight to make sure the bracket is not loose.
3. Eye Hooks
Eye hooks are cute to look at and trendy when it comes to professional framing. But you'll be surprised to how easy they are for home utility. Small-sized eye hooks are useful and durable enough for a canvas. They don't take up much space between the wall and the frame too. To attach a canvas, you will need two eye hooks, a wire and a nail.
Step 1: Fix the eye hooks on each side of the canvas (about five inches from the top is fine).
Step 2: Then attached the wire between the two eye hooks.
Step 3: Make a centre with a pencil and use a hook or a nail to attached at that point.
The beautiful thing about this method is that you can adjust the art wire to ensure the canvas hangs precisely how you want it to.
4. J-Hooks
J-hooks look very similar to eye hooks, but they are an excellent option for a broad canvas or a big-sized canvas. These hooks come in different sizes and would require fixing them with one or two nails. One small J-hook would work out just fine for smaller-sized paintings while for heavier ones you'd need only two or more nails to mount it on the wall for sturdy hanging. Again, it depends on the size of your canvas.
Step 1: Place a few pencil markings according to how many hooks you are using. Use a measuring tape to make the best of the points and halfways needed to mark the spots.
Step 2: Try to position the j-hook on the wall. The corresponding nail that comes with it will directly go into the hook. Hammer it at a slight angle.
Step 3: The hooks should align perfectly on the wall, so make sure of it before hanging the canvas; otherwise, the view would be crooked.
5. Adhesive Strips

These may be the easiest of all arrangements. Sticky hanging hardware items are mostly made in a way to avoid any damage to the walls. They are very straightforward and come with velcro and adhesive combination. But for custom-made photo canvas, make sure you know the weight of it before getting started with adhesive strips because most of these strips have a limited weight holding capacity. Generally, between four to 16 pounds is their holding capacity.
So for canvas prints, you will need at least four adhesive strips, i.e. one for each corner depending on the size of the canvas.
Step 1: Take a measuring tape and mark with pencil spots to place the strips. You can add a soft straight like to ensure the marking is straight.
Step 2: Place the strips on each corner of the canvas. Add more adhesive strips if needed.
Step 3: Now press the canvas to the wall in alignment with your marked points to make the velcro and adhesive stick together.
So, here are the five ways you can use to hang your beautiful canvas art. It is your personal preference now as to how to want to attach, but the important thing is that you can now proudly display your canvas prints.
Canvas prints can make your home elegant. Whether it is in the form of an inherited oil painting or a custom photo canvas, the result on the wall will create clean matching with your modern décor. The bonus is the joy and satisfaction you will feel when you see your favourite canvas art hanging in its ideal spot.
You can check out more options for hanging with CanvasChamp. Apart from these options, you can use easel back, easel stand and dust cover back to correctly position your canvas print where you need. Visit CanvasChamp blog for any ideas if you need how to place canvas wall art in your home decor.


